
This tut has been done several times on the net. I am sure you will find variations as you go along. This is my version, and uses no external plugins. You will, however, need a couple of supplies. Once again, credit for this tut goes to blankgiftags. To find out more about membership you'll need to Click Here.
This tutorial assumes that you have knowledge of psp,animation shop, working with layers, tubes, and understand which tools are which. Before we begin, you are going to need some supplies. You can download these Here:
Click here to download supplies
1. Open the silver gif in animation shop.
2. Install the font for use in psp. You can do this by double clicking it and minimizing the window. Or by putting it in your fonts folder and double clicking it and closing that window. Or however you prefer to install your fonts.
3. The remaining file is a psp preset. This goes into the preset folder in your psp program. Not in the filters folder. It will be something like c:\program files\jasc\paintshoppro\presets.
Now that everything is where it should be, we are ready to begin.
1. Open paint shop pro.
2. Go to animation shop. You should see three frames of the silver gif. If not click on the middle square in the upper right corner of your gif to maximize it so that you see all three frames.
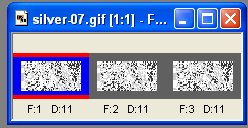
3. Choose edit-select all. Now, choose edit-copy.
4. Go to paint shop pro. Anywhere in the workspace, right click and choose paste as animation as multiple images.
5. You can minimize these files or leave as they are, we will use them later on.
6. Now we will open a new image. You need to make this big to start, so I would make it 500x500, transparent.
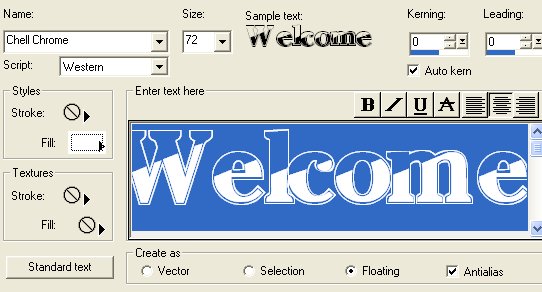
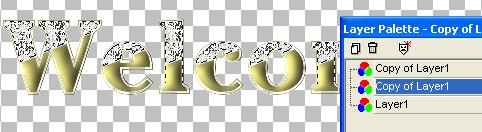
7. Choose your text tool and click on your image to add text. You will need to select the font-Chell Chrome-size 72-antilias checked-floating checked. On your styles palette, choose null for stroke and white for fill.
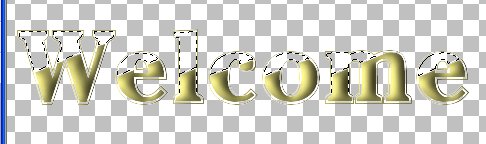
8. While your text is still floating, choose effects-3 d effects-inner bevel. In the drop down box, choose gold bevel. You can play with the shininess if you want to brighten up some.

9. Press CTRL+D on your keyboard to deselct your text.
10. Now, take your magic wand and hold the shift key on your keyboard down while you select the blank areas inside the top of each letter of your text. Holding the shift key down allows you to select them all at one time.
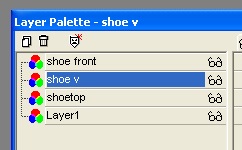
11. Now, on your layer palette, you are going to right click on the layer and duplicate it. You will do this twice so that you have three layers.
12. On your color palette, select pattern for the fill type, and then choose the first silver image, it should be image 1.

13. On your layer palette, make sure layer 1 is highlighted, this should be the bottom layer, and flood fill with your pattern.

14. Now, on your color palette change the pattern to the second silver image, it should be image 2.
15. On your layer palette, highlight your middle layer, and then flood fill your image again.
16. Now, on your color palette, change the pattern to the third silver image, it should be image 3.
17. On your layer palette, highlight the top layer, and flood fill with your pattern.
18. On your keyboard, press CTRL+D to deselect.
19. At this point, you would be able to save your tag as it is, but we are going to go ahead and show how to dress it up further.
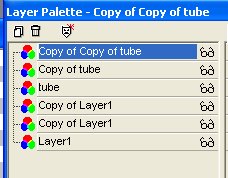
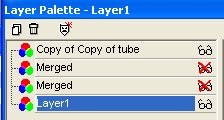
20. Choose a tube you would like to put on your tag.
21. On your layer palette, add a new layer and name it tube.
22. Put your tube on this layer and position it where you like.
23. Now we are going to duplicate that layer 2 times.
24.Click on the sunglasses on each layer except tube and the top copy of layer one to turn off visibility.
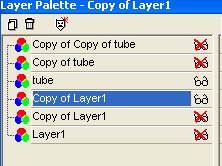
25. On the copy of layer one that is visible, right click and merge visible. Turn the visibilty of this layer off, and the one above it on, and then the one below it on.
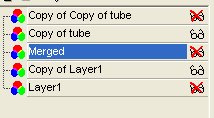
26. On the copy of layer one that is visible, right click and merge visible. Turn the visibility of this layer off, and the one above it on, and then the one below it on.
27. On the copy of layer one that is visible, right click and merge visible. Turn the visibility of this layer off, and the one above it on, and then the one below it on.
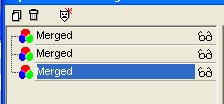
28. Now make sure all of the sunglasses are unclicked so that visibility is on, on each layer.
29. Now we are going to add a drop shadow. So, add a new layer and name it back.Pull it to the bottom of your layer palette by clicking on it and holding while you drag it down.
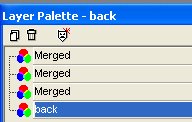
30. Flood fill this layer with a color of your choice. I am using white.
31. On your bottom merged layer, choose effects-3d effect-drop shadow. Apply a light drop shadow. It will darken up as we apply it to the other layers.
31. Apply the same drop shadow to the other two merged layers.
32. Now, the image has a lot of empty "white" space. We are going to use our crop tool, to draw a rectangle around our image, then double click to crop.

33. Now save your image as a psp file.
34. Bring up animation shop. Go to file-preferences-general program preferences-layered files. make sure that each frame shows first and current layers is checked.

35. Open your psp image. Click to maximize it so that all four frames show up.
36. Right click on the first frame which is just solid white, and delete.
37. Now view your animation by going to view animation.
38. Close out the animated view and save your file as a gif, using the default settings and highest quality.
Walla!

A new tag is born! This tut has lots of possibilities, just let your imagination take over!


| HOME | MEMBERSHIP | PSP TUTS |